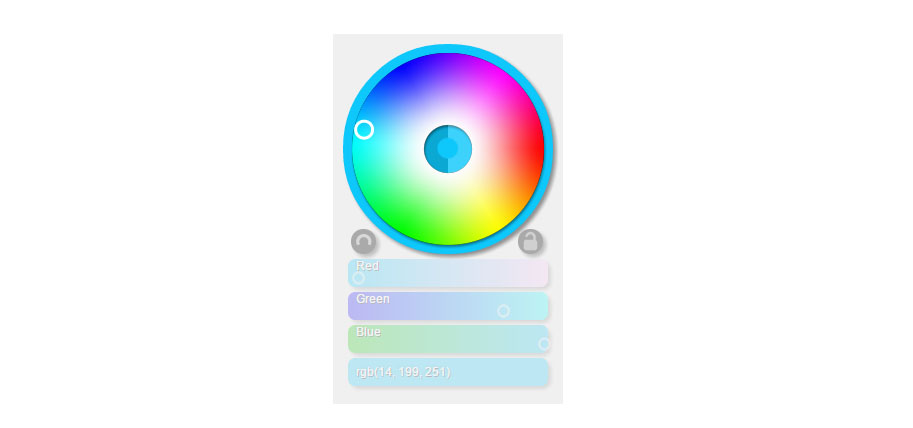
The Top Widget
The top widget is designed to let you choose hue and vibrance of your color almost at a glance. Brightness value can be controlled either by the slider below, or nudged by the widget centre halves.
The tattoo industry is undergoing a digital renaissance. Gone are the days when a tattoo artist needed only needles and ink; today, the modern tattooist is also a 3D visualization expert. At the center of this revolution is a powerful trifecta: the iPad, the app Procreate, and high-fidelity 3D models.
Searching for the keyword "3d model tattoo procreate" opens a gateway to a workflow that allows artists to wrap flash art around virtual biceps, map mandalas onto curved spines, and simulate lighting on textured skin before the client ever sits in the chair.
In this guide, we will break down exactly why 3D models are changing the tattoo game, where to find the best assets, and how to master the technical workflow inside Procreate to turn your flat designs into living, breathing previews.
Once you have painted the tattoo on the 3D model, how do you show the client?
Every 3D model has seams (where the 2D texture wraps around the 3D object). If you draw across a seam, Procreate handles the mathematics, but the visual might jump. Check for "seams" on the back of the arm or inner thigh before you start.
It is easy to zoom in 500% to draw a perfect eyelash. When you zoom back out and rotate the model, that eyelash might look like a black blob. Constantly rotate and zoom out to check the "hero angle"—the angle the client will see in the mirror.
If you want, I can produce a specific design (style, subject, size) and generate the exact layer structure and export files—tell me the tattoo theme, preferred style (realistic, neo-traditional, geometric), and placement size (e.g., forearm 10×10 cm).
(related search terms provided)
Here’s a good review example for a “3D Model Tattoo” brush set or stamp pack for Procreate, written as if posted by a satisfied user:
⭐️⭐️⭐️⭐️⭐️ – Total game changer for tattoo design mockups
I’ve been looking for an easy way to show how my flash designs would look on actual body contours without having to manually warp everything. This 3D model tattoo set for Procreate completely solved that problem.
The brushes/stamps are incredibly high-res — the skin texture and lighting on the 3D models (arms, legs, back, chest) look realistic, not cartoony. I just drag and drop my tattoo designs onto the model layer, set the blend mode to Multiply or Hard Light, and it instantly looks like it’s wrapped around the body part.
What I love most:
Saved me hours of work. My clients now approve designs faster because they can actually see placement and sizing in 3D. Highly recommend for any tattoo artist or apprentice building their portfolio.
Using 3D models in Procreate allows tattoo artists to plan, place, and visualize designs on a realistic human form, ensuring the art flows naturally with the body's contours 3d model tattoo procreate
. This feature helps clients better understand the final result before the tattooing process begins. Key Steps for Using 3D Models Tattoo Placement and Planning Using 3D Models in Procreate
Visualizing Your Art: A Guide to Using 3D Models for Tattoos in Procreate
The days of trying to explain to a client how a flat drawing will wrap around their forearm are over. With the introduction of 3D painting, Procreate has revolutionized the tattoo design process. By importing 3D models of body parts, you can now paint directly onto a three-dimensional surface, ensuring your designs flow perfectly with the human anatomy. Why Every Tattoo Artist Needs 3D Models
Designing on a 2D canvas is a standard skill, but tattoos are 3D by nature. Using Procreate's 3D features allows you to:
Visualize Wrap and Distortion: See exactly how a design curves around a wrist or calf.
Improve Client Communication: Show clients a realistic preview of their tattoo before the needle even touches the skin, which enhances accuracy and productivity.
Master Depth and Shading: Practice 3D tattoo styles—which use color variation and shadowing to create depth—on a realistic digital model first. How to Import 3D Models into Procreate
Procreate supports .USDZ and .OBJ files. Many artists use pre-made "Body Bundles" specifically designed for tattooers.
Obtain your file: Download a 3D model (like a hand, arm, or torso).
Import to iPad: Save the file to your "Files" or "Photos" app.
Open in Procreate: Tap the share icon on the file and select "Copy to Procreate." It will automatically open as a new 3D project. Design Tips for 3D Painting
Use Realistic Lighting: You can adjust the "Environment" settings in the 3D panel to see how your design looks in different lighting conditions.
2D vs. 3D View: You can toggle between the 3D model and its flattened "UV Map." This is helpful for cleaning up fine lines that might be tricky to draw in perspective.
Layers are Key: Treat the 3D model like a regular canvas. Use layers for your stencil, shading, and highlights so you can make adjustments without ruining the base design. Taking Your Portfolio to the Next Level The tattoo industry is undergoing a digital renaissance
If you're a tattoo apprentice or a seasoned pro, including 3D visualizations in your digital portfolio shows a high level of technical proficiency and care for the final result. It bridges the gap between a "cool drawing" and a "perfectly placed tattoo."
Whether you're working on hyper-realistic pieces or classic American Traditional, 3D models in Procreate are the ultimate tool for modern tattoo preparation. 3D Nipple Tattoo Post Mastectomy: What to Know
Mastering 3D Model Tattoo Design in Procreate Using 3D models in Procreate has revolutionized how artists design tattoos. It allows you to wrap art around realistic body parts, ensuring the placement, flow, and distortion are perfect before the needle ever touches skin. 🚀 Getting Started with 3D Models
Procreate comes with a built-in 3D Model Base Set including a face, torso, and arms.
Download the Models: Go to the "What's New" section in the Procreate Gallery to find the standard 3D pack.
Import Custom Files: You can import .USDZ or .OBJ files if you have specific body part scans.
Navigation: Use one finger to rotate the model and two fingers to zoom or pan. 🎨 How to Design the Tattoo
Designing on a 3D surface is different from a 2D canvas. You are painting directly onto the mesh. 1. Identify the Map
3D models use UV maps (flat representations of the 3D surface). Open the Layers panel. Tap the cube icon to see the different parts of the model.
Select the specific area (e.g., "Forearm") to begin drawing. 2. Use 2D vs. 3D View
You can toggle between drawing on the 3D model or the flat 2D texture map. 3D View: Best for checking flow and anatomy.
2D Texture View: Best for technical details and clean linework. 3. Lighting and Environment Go to Actions > 3D > Edit Lighting & Environment.
Adjust the light source to see how the tattoo looks in different settings.
This helps show the client how the ink will "read" in real life. 💡 Benefits for Tattoo Artists Once you have painted the tattoo on the
Zero Distortion: See exactly how a straight line wraps around a curved bicep.
Client Visualization: Show clients a 360-degree preview of their piece.
Stencil Prep: Export the flattened UV map to create a more accurate stencil.
Portfolio Mockups: Create high-end digital mockups without needing a photoshoot. 🛠 Pro Tips for Better Results
Reference Layers: Keep your sketch on a separate layer from your final linework.
Opacity Checks: Lower the model's texture opacity to see the "skin" better.
Brush Settings: Some brushes behave differently on 3D surfaces; stick to monoline or tapered ink brushes for the best stencil results.
📌 Key Takeaway: 3D modeling in Procreate removes the guesswork from complex placements like elbows, knees, and wrap-around sleeves.
The Digital Evolution: 3D Tattoo Modeling in Procreate The tattoo industry is undergoing a digital revolution, with
emerging as a pivotal tool for professional artists. Since the introduction of its 3D painting features, artists have transitioned from flat, two-dimensional sketches to immersive, three-dimensional previews. This shift allows for unprecedented accuracy in design placement and client visualization. Bridging 2D Art and 3D Form
Traditional tattoo design often struggles with "warping"—the distortion that occurs when a flat image is applied to the curves of the human body. Procreate’s 3D environment solves this by allowing artists to paint directly onto OBJ and USDZ models. Artists can import body-part-specific models, such as full-sleeve arm templates
, to see exactly how a design wraps around muscle groups and joints. Tattoo Placement and Planning Using 3D Models in Procreate
The ultimate goal of using a 3D model tattoo Procreate is to improve your real-life application. The digital preview is a promise; your stencil application is the delivery.
The Stencil Hack: After finishing your design on the 3D model, turn off the "Base Color" layer. You are left with just the tattoo lines. Export this as a high-contrast PNG. Use a projector or a thermal printer to blow this stencil up to real size. Because you drew it on a 3D curve, the stencil will already have the "wrap" built-in.
Color is easy. Shading is hard. Procreate allows you to paint not just color, but Roughness and Metalness.
To wrap up this guide, here is a cheat sheet for your next session:
No CPU Overheads
While painting, the color picker takes no CPU from Photoshop whether full sized or minified. It only comes to life when you're changing colors, and it does that spectacularly.
The Top Widget
The top widget is designed to let you choose hue and vibrance of your color almost at a glance. Brightness value can be controlled either by the slider below, or nudged by the widget centre halves.
The Sliders
The sliders at the bottom are self-explanatory, and can be toggles between Hue Saturation Brightness, Reg Green Blue, or all. Just click the middle left button to toggle.
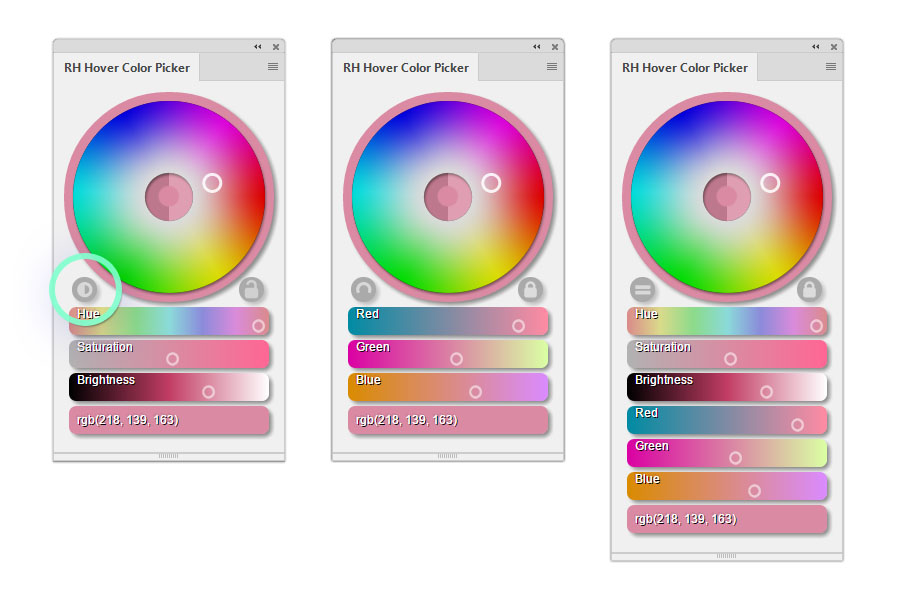
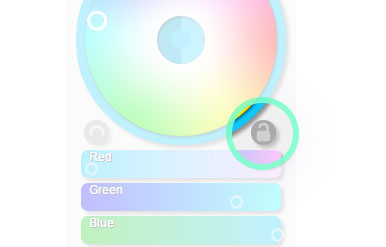
Always There
If you prefer to keep the whole palette on screen without it minimizing itself automatically, you can toggle the lock button on the middle left:
Compatibility
All Extensions and tools are fully compatible with both Windows and Mac Platforms


Buy Now